
Basic Amazon Connect Configuration Overview
Creating an Amazon Connect cloud based call center is relatively easy for a non-technical business process manager to implement. You do not have to be a software engineer to get a basic inbound call center operational in a remarkably short time, often less than an hour. Setting up a basic inbound call center however, is generally not going to meet your over all call center functional requirements and you will need some software engineering assistance from not only experience call center professionals, but from engineers who are certified and experienced in all Amazon Web Services! A Call Center will generally require some integration with CRM solutions, or databases that can provide custom routing based on customer historical interactions. You may also want to replace old world phone trees or Interactive Voice Response (IVR) systems with modern Chat Bot options! Why “press 1 for this, or press 2 for that” when the natural language speech processing is available.
What Information do we need to setup our Call Center?
Generally a basic startup inbound call center deployment starts with a Call Flow Plan. To help you better understand the concept of “Call flow”, lets walk through a basic Amazon Connect configuration:
- First you will need to create an Amazon Web Service Account. This is very simple and though there is a free tier, you will need to put in a valid credit card to open the account.
- Once you create the account as the root owner, you will then need to go to IAM and create a user account that has permissions to create an Amazon Connect instance and also to access the various other services your call center may need.
- This new user should then login and find Amazon Connect and launch a new instance in the Region you want to make use of (i.e. US-East)
- Once the Instance is created you will do the following in this order:
- Claim a Phone Number – You claim a number through Amazon and it can be either toll free, or a direct dial local number of your choice
- Establish your Business Hours of Operation – When are you open and when are you closed? Global or by Customer Service Queues
- Create Customer Service Queues (CSQ) – Technical Support, Customer Service and Sales are typical examples
- Create Prompts – What does a caller hear at each step through the call flow? You can do these in TEXT format for conversion to speech and then later, when firm, record with human voice
- Create Contact flows (Call Flows) – Answer Call, Play Prompt 1, Get caller input, route to caller choice, queue if no agent available. Here is a short video we created on the importance of good call flows.
- Create Routing Profiles – Queues are placed in these profiles. Users are put in Queues together they determine who handles what callers
- Create Users and assign them to Routing Profiles
This information will be the basic configuration required to build a very basic Inbound call center. With this information complete, Agents will be able to log into the customer service queue they are assigned to handle. You should be able to call your claimed number and be routed through your flow to an available agent. If not agent is available, callers will queue and listen to the care prompts you have provided. All this is captured in both real time metrics and historical reporting.
Moving from a Basic to an Intermediate Call Center
You basic call center will have many additional requirements that will generally require a more experienced design and implementation engineer to become involved! So lets revisit the items under step 4 above and look at the options that might exist beyond that basic configuration:
Claim a Phone number – Generally you will call forward your existing number to this new call center number. Optionally, you can “port” or move your current number directly to Amazon. More importantly, you will generally have more than one phone number. Phone numbers generally terminate in either an IVR or directly into a CSQ. Ideally if you can assign a phone number directly to a CSQ you can avoid prompting callers to select from a menu and this is always a better solution. Why “Press 1” for Spanish, if you could publish a number that is always speaking Spanish. If the Caller is going to be prompted by an IVR, the question is what does that menu of options include? Someone has to write this out so that the various outputs can be mapped to required call flows. The next question is should this be a “Press X” type of IVR or would a natural language speech interface be more appropriate? What would you prefer to have your callers hear? “Please press 1 for sales and 2 for service” or “Thank you for calling, how can I direct your call”? Amazon has a service named LEX (you may have heard of his sister Alexa) that can be added to replace or augment the old “Press” option menu!
Business Hours – Seems straight forward, you list out your work days and your closed days. The real question is do all CSQ’s fall under the same time calendar? Or is Technical Support open on days and times when the Sales line might be closed? If so you will need to create a business hours time/calendar for each CSQ in your deployment. You might also want to create a business hours schedule for when we stop offering callers the call back option. For example, we are open from 9-5 Monday through Friday. However, at 4:30 we do not want customers holding for an Agent to be offered the option of a call back. This would require a dedicated business hour schedule for that function.
Create CSQ’s – Clearly each queue has to have a unique personality, schedule and agent pool. The call flow for each queue may be different. Some options offered callers to Technical support may not be offered to callers to the Sales line! Just create a list of queue names to become part of your call center call flow.
Create Prompts – Generally we encourage the creation of prompts to be among the first items on your “to do list”. Thinking through the message your callers hear as they self navigate your call center can help you plan your call flows more effectively. Amazon offers a service that is build into Amazon Connect named Polly! Polly is a “text to speech” engine and a great tool for developing prompts. We prefer to use this solution until we debug your call center call flow and everyone agrees the prompts are exactly as required. Then, even though Polly has many excellent voices to choose from, you can then have these scripts professionally recorded. We can help you with that as well!
Contact Flows – This is the basic blue print for how your call center works! It is a series of building blocks that define the customer experience from the first incoming ring, until the last interaction and call termination. Each Phone number that enters the call center needs to have a diagramed “call flow” that shows the various steps the caller is to navigate. It might look something like:
- Call is received after business hours and hears “You have reached us outside of our normal business hour M-F 5-9. Please hold and we will transfer you to the message center”.
- Caller is answered with prompt “thank you for calling, you call will be recorded for service improvement”;
- Caller is routed to IVR Tree: “Please Press 1 for Sales and 2 for Service”
- Caller that Presses 1: Capture the Caller ID and use that to look up the caller in Salesforce.Com and then transfer the caller to the next Available Agent in the Sales CSQ along with the SalesForce screen pop.
- Caller that Presses 2; Is transferred to another IVR menu: “Please Press 1 for new order, or press 2 to check the status of an existing order”. Caller that Press 1 is sent to SalesNewOrders CSQ. Caller who presses 2 is transfered to another IVR: Press 1 if you know your order number”
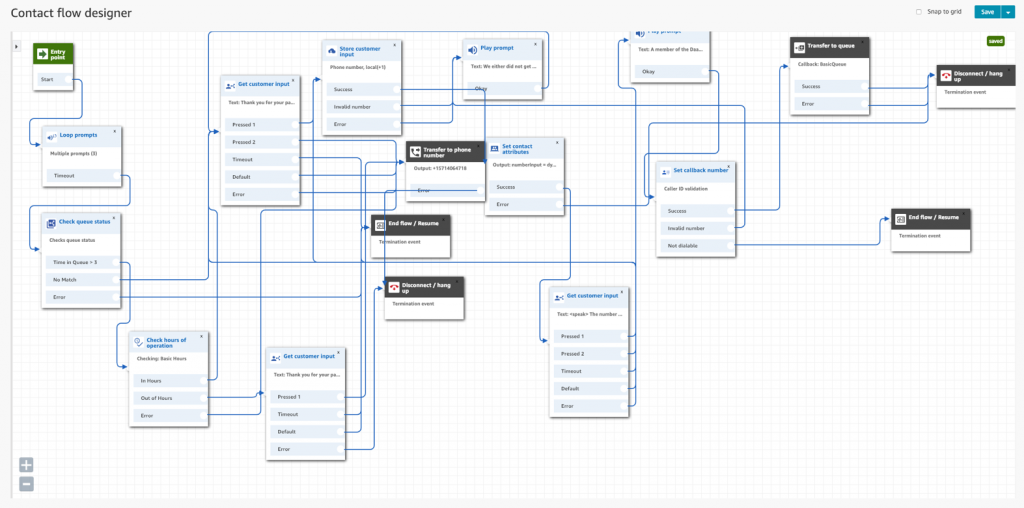
Clearly this would be better drawn as a “organizational chart” but we think you get the basic requirements of a call flow. When working in Amazon Connect your call flows will be graphically constructed and look something like this:
Create Routing Profiles – Call profiles are used to match callers to a queue or a list of queues. So a phone number might point to a contact flow that offers the caller a choice between Sales and Service. Choosing Sales, for example will route the caller to a profile that contains a list of Sales Queues and priorities. You might say route the caller to Sales and if they are not answered within 60 seconds route them to customer service priority queue for handling. Call profiles enable the list of queues, the order of queues and the priority of queues for this reason.
Major Functional Feature Enhancements
It is rare to find a call center that does not have a requirement to integrate with a CRM package like Salesforce.com, SugarCRM or EPIC. Often enterprises will have a custom database on their internal network that contains customer specific information that can be used to assist in routing callers, or providing additional screen pops to agents. Chat Bots are also becoming important in off loading typical requests to an automation process that speaks natural language! Did you know that Amazon Web Services has a range of services that include transcription, language translation and language comprehend? You can run your voice recordings through a transcribe utility that you can then “key word search” to help improve agent productivity. Or run that same recording through a language translation service that can take input in one language and create out put in another language. How about TEXT messaging and Email Options? Not all customers want to call, some may want to send an email or text message to the next available agent. The functionality of your call center is shaped only by your imagination! If you can envision it, Amazon Connect can implement it!
Other Useful DrVoIP Amazon Connect Subject Matter Posts:
- What makes up a Basic Amazon Connect Call Center?
- Amazon Connect Discover Questions for Call Center Planning
- Amazon Connect Planning Guide
- Part 1 series on Configuring Amazon Connect
- Part 2 series on Configuring Amazon Connect
- Part 3 Configuration Amazon Connect
- Amazon Connect “Forced Release” Options
- Amazon Connect building prompts with Polly
- Building Conversational LEX Solutions
- Amazon Connect Call Back from Queue Options
- Amazon Connect Check List
- Amazon Reporting Elements
- Amazon Connect Custom integration Tools
- Understanding Amazon Connect Billing
- Amazon Connect & Dextr.Cloud Agent Dashboard
- Three Minute Video Overview of the Dextr Dashboard for Amazon Connect
Summary
We have yet to find a Call Center requirement we could not implement with Amazon Connect and the every growing library of Amazon Web Service solutions! If you can see it and express it, we can implement it. Let’s put our heads together and construct a call center that meets and exceeds your call center requirements!
 Technorati
 Del.icio.us
 Slashdot
 Digg
Digg twitter